Image Control Panel
Tool Panel
Data Table
Track Control Panel
Analysis Panel
Locate Control Panel
Auto-Locate Dialog
Selected Region Control
Image Controls
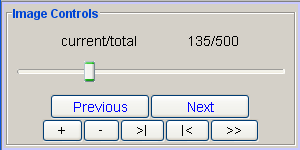
The image control panel controls which slice you are currently looking at.
Previous and Next buttons step through the image, the Left and Right arrow keys are the keyboard shortcuts
The "+" and "-" buttons zoom in and zoom out respectively. The keyboard shortcuts are the "+" and "-" keys.
>| and |< buttons move to the first and last frames.
>> causes the movie to play continuously until 'cancel' is pressed.
Tools Panel
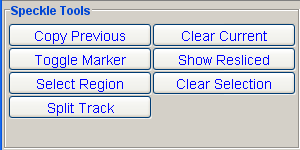
Copy Previous: copies all of the speckles marks from the previous frame to the same position on the current frame. Each speckle mark is added to the speckle track it was generated by.
Clear Current: deletes all of the speckles that are contained in the selected region, and exist in the current frame. If there is no selected region then all speckles in the current frame are deleted.
Toggle Speckle Shape: Changes the shape of the speckles to to make it easier to see. There are three shapes, a circle, an 'x', and no shape.
Show Resliced: This starts the reslice control. It will also change to only include data that is in the Selected Region.
Select Region: Allows you to select a region of interest by right clicking and dragging to form a rectangle. An example is found here.
Clear Selection removes the selected region.
Split Track Splits the currently selected track into two. All of the marks before the current frame are added to a new speckle track and removed from the selected track.
Speckle Data Table
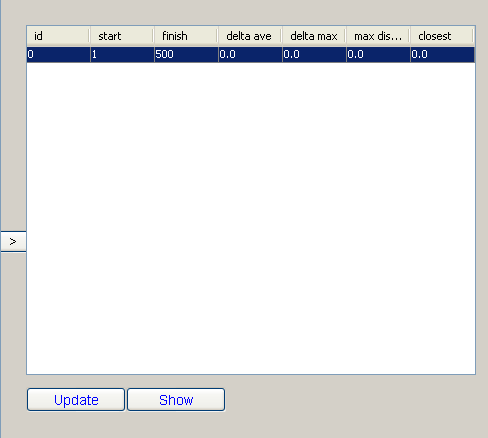
The data table is used to select speckle tracks and navigate to their beginning and ending quickly. By clicking on the column headings the rows will be sorted by the value in the associated column.
Update: recalculates values.
Show: Shows a text window with current data.
> or <: show or hide the data table.
The columns values are currently as follows:
- "id" for counting.
- "start" is the first frame of the speckle track.
- "finish" is the last frame of the speckle track.
- "inner change" is the change in total intensity between the last frame of a speckle track and the frame following it, within a circle centered at the speckle mark. The radius of the circle is set in parameters.
- "outer change" is the same as "inner change" but for a ring around the inner circle. The size of the outer radius is set in the parameters.
- "max displacement" the largest the speckle moves between frames.
- "closest" indicates the distance of the closest speckle.
By clicking on the heading of the columns the data will be sorted by the value in the column, either ascending or descending.
Some of the values are not updated continuously so pressing "update" will refresh the table. "Show" will create a text window with all of the data values.
Track Panel
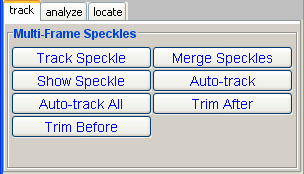
Track Speckle: For manually tracking one speckle from the current frame to the next frame. Click the Track Speckle button, then click on the speckle mark you wish to track. The image will move to the next frame. Click to place the speckle. You can change frames while tracking but the speckle track will not have a mark on frames in between. Apply the Linear Refine Model to make a speckle track have a mark on every frame between the starting and ending frame. Tracking is demonstrated in the basic tracking tutorial. Shortcut 't'.
Show Speckle: Shows every frame of a speckle track by creating an image stack from a crop of the original image stack around every speckle mark. The size of the cropped region can be changed in the "Analyze" panel. Shortcut 's'.
Trim After: removes the speckle track from every frame after the current frame.
Trim Before: removes the speckle track from every frame before the current frame.
Merge Speckles: Merges two speckle tracks. Click the merge speckle button, if there is no speckle selected you will need to select one. There is a blue outline showing the location of the selected speckle. Click on the speckle mark of the track you wish to merge. You can change to different frames to select speckle tracks that are not in this frame. Shortcut 'n'.
Auto-Track: Applies the current model to a selected speckle track. Shortcut 'a'.
Auto-Track All: Applies the current model to EVERY speckle in the Selected Region.
Analysis Panel
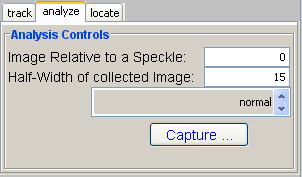
Capture Images: Clicking on capture with create a stack of images that corresponds to speckle marks that meet the following criteria.
Image Relative: refers to the frame in reference to the location of the speckle. Positive numbers are after and Negative numbers are before.
Half-Width: Determines the size of the cropped image.
Which Speckle: Sets the criteria for which speckle marks are cropped for the Capture Images. Appearance will choose the frame the speckle track begins. Disappearance will choose the last frame the speckle track is marked. Normal crops around every speckle mark.
Locate Panel
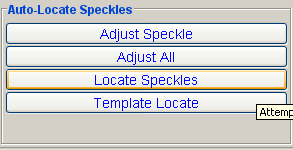
Adjust Speckle: adjust the selected speckle mark to the center of intensity over a 5x5 square centered at the speckle mark. The center of intensity algorithm is applied five times. Shortcut 'm'.
Adjust All Speckles: adjust all of the speckle marks in the current frame. This is less aggressive than the single speckle adjustment because the center of intensity algorithm is only applied once per speckle mark.
Locate Speckles: uses a threshold and connected regions algorithm to locate speckles. The dialog is explained below.
Template Locate Speckles: Creates a template using all of the existing speckles, and then uses a normalized cross-correlation to filter image. Then a threshold is applied and a connected regions algorithm is used.
Autolocate Dialog
Whenever an autolocate is used a dialog will pop up to allow vetting the results, no new speckles tracks are added unless the speckles are 'accepted.'
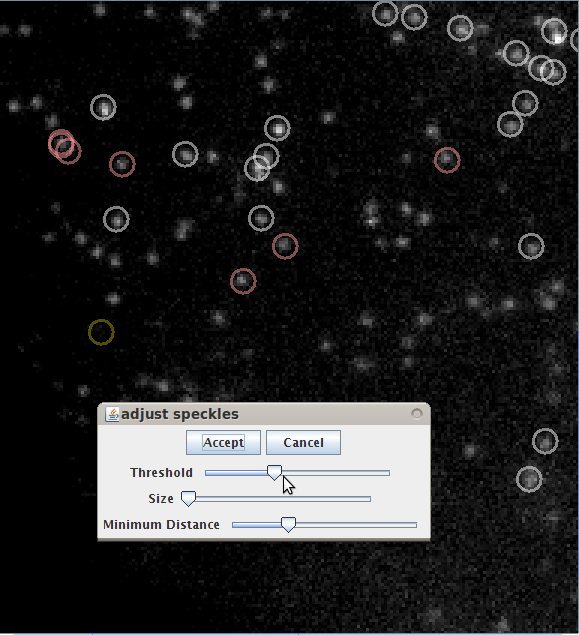
Threshold: Sets a threshold for detecting speckles.
Size: Culls the autodetected speckles by setting a minimum size.
Distance: Prevents placing speckle marks too close to existing speckles marks and other prospective speckle marks.
Selected Region
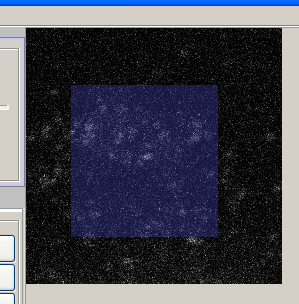
The above image illustrates a selected region by clicking on the select region button and then right clicking and dragging to the desired region. The region will limit the speckles used for autotracking, autodetecting and adjusting.
The selected region will also limit the pixel data that is used for the reslice control. After selecting a region, click the "Show Reslice" on the "Track Panel."